
UPDATED JANUARY 2019 One of the most common Halloween costume accessories is a set of wings. Bats, fairies, butterflies, angels, ladybugs, owls and dragons will all be flying around on Halloween night. A lot of the costume wings available at the store are not very practical for kids - and, I am all about being practical. I like costumes that can be worn in the car and at school, and are comfortable enough that my kids actually want to wear them! So, I love this fast and simple wings design. From start to finish, these wings only take about 10 minutes. They are soft and can be worn anywhere with anything!
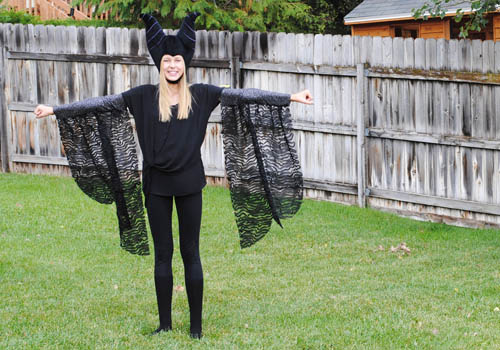
Have you see Disney's movie Maleficent? It is the untold story of the iconic evil villain Maleficent. Her story is tragic and her wings are one of the key elements of her journey. She is going to be very popular this Halloween! Because her wings are such a focal point of the story, I thought they would be a perfect example for the tutorial. (You can use this basic pattern for any type of winged character.)

You will need:
Stretch fabric the length of your arm (I bought 22 inches)
1 yard of fabric for your wings (I bought a black lace design)
Sewing supplies
Measure your arm from wrist to shoulder. Mine was 22 inches. That is the length of your arm band. The width of the band should be 1 inch bigger than the largest piece of your arm. Mine was 11 inches, so I cut it to be 12 inches. Cut the stretchy fabric into two rectangles according to your measurements. Mine was 12 by 22 inches.
Note: You want the stretch of the fabric to go around your arm. So, cut the fabric with the stretchy direction across the width and the not-so-stretchy part across the length.
Once your pieces are cut, fold each one in half lengthwise. Place a long ruler along the open edge at a diagonal. You want to create a slight taper. Arms are typically bigger at the top than at the wrist. So, cut about an inch off the bottom and have it taper up to the top. Like this:
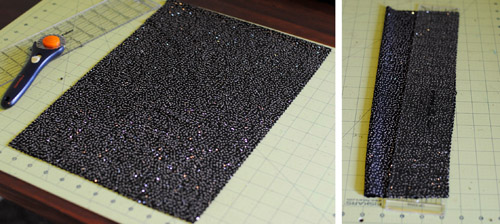
Next, prepare to cut the wings. Fold the yard of fabric in half. Start at the fold and cut the wings shape into the fabric, moving up and over in large scallops. You can just eyeball it! Then, cut along the fold to separate the fabric into two wings.

Lay one of your arm bands out upside down on a flat surface. Pin the top of the wing onto the edge of the arm band. If the wing is longer than the arm band, fold and pin small pleats as you go. Make sure that the long part of the wing is attached to the wide section of the arm band. You want the wings to be shorter by your wrists.

Then fold the arm fabric over and pin it in place.

Sew the seam closed with your sewing machine. Make sure you are catching the top and bottom parts of the arm band. I like to take the pins out as I sew. I found that using a "stretch stitch" on this type of fabric is very effective. The stretch stitch will allow you to stretch the seam without popping and breaking the thread. I did a google search to find out how to do it on my machine. It was really easy to figure out! It will make sewing on any type of knit or lightweight stretchy fabric so much better.
That's all it takes to make these cute 10-minute Maleficent Wings! Good luck.
The process is basically the same for making child wings. The main difference is you don't have to taper the arm band because their arms are pretty much the same width the whole length of their arm. I will demonstrate a slight variation on the wing style to give an idea of all of the different ways you can use the basics of this tutorial to fit whatever winged character you are creating!
You will need:
Stretch fabric the length of your child's arm (Mine was 12 inches)
About 8 inches of fabric for your wings in two colors/styles
Sewing supplies
To start, cut the arm band in a rectangle shape using the length of your child's arm and twice the width. Mine measured 12 inches by 7 inches. Make sure that the stretch of the fabric is going the width of the arm band. You want it to "give" as it goes around the arm.
Next, cut the wing portions out of the wing fabric. The shape is an elongated circle about 8 inches wide and 13 inches long. You will need four total - two pieces in each color. Cut the top off one pair of the wing pieces. Measure down two inches on one side and put your ruler in a diagonal to the opposite top corner. It is demonstrated in the photo below:

Next, pin the wings onto the arm bands. Place the arm band fabric face down on a flat surface. lay the wings face up on the fabric overlapping slightly with each other. Then fold the fabric over and pin it in place.


Then, sew the seam together using a stretch stitch.

It's as easy as that! Simple beautiful wings in less than 10 minutes - perfect for Halloween!

One other nice thing about these wings is they are an easy and beautiful addition to any of our princess dresses. Just add wings and now you have a fairy princess! The dresses below start at just $29.99 and are perfect for Halloween, dress-up for some magical play at home and your Disneyland vacation! Click the image below to shop all of our discounted merchandise now.

If you'd like to experience Halloween Time at the Disneyland Resort this year, there's still time! Check out our Disneyland packages for travel this October, or you can start planning for next October and get the best deal with our layaway lock-in. Just $175 down will lock-in your low price on your Disneyland vacation and final payment isn't due until five days prior to travel. Book online or call our Disney Experts at 855-GET-AWAY.

Check out these other great articles:
Disneyland Tips for Your First Trip
Disneyland Halloween Apples Tutorial: Magic at Home
Disney's Halloween Time and Mickey's Halloween Party 2014


Join the Conversation!
Leave A CommentGet Away TodayOctober 13 2014
Hey Emily, We actually bought the hat at Disneyland, but you can kind similar hats online. Here's a link to one we like: http://www.amazon.com/gp/product/B00J1LW5ZC/ref=as_li_tl?ie=UTF8&camp=1789&creative=9325&creativeASIN=B00J1LW5ZC&linkCode=as2&tag=wwwgetawayt06-20&linkId=IW2NXJJMAJRSRD36
EmilyOctober 10 2014
How did you make the hat?