
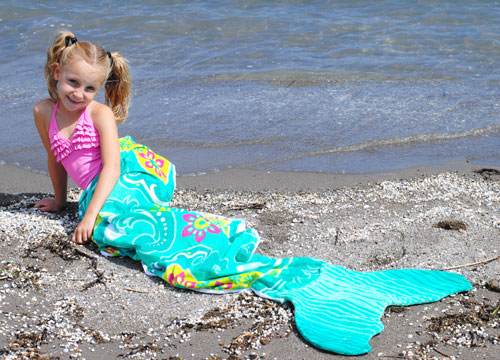
DIY Beach Towel Mermaid Tails
In the land of make believe there are many magical and beautiful creatures. Our very favorite are mermaids. My daughters love pretending to be mermaids, especially when we are at the beach. There is something so exciting about being able to swim under the sea! I am pretty sure everyone has wanted to be part of Ariel's world at one point in their life. With summer in full force, I thought it would be fun to create a mermaid swim towel to take to the pool and beach. I am very excited about the way our beach towel mermaid tails turned out and can't wait to share this tutorial with you.
DIY Beach Towel Mermaid Tail Supplies
2 Matching beach towels (for the tail body)
1 Beach towel (coordinating fabric for the fin)
6 Yards of 1" ribbon
Fin patterns (download for free below)
Bottom Fin Pattern
Top Fin Pattern
Rotary fabric cutter
Basic sewing supplies
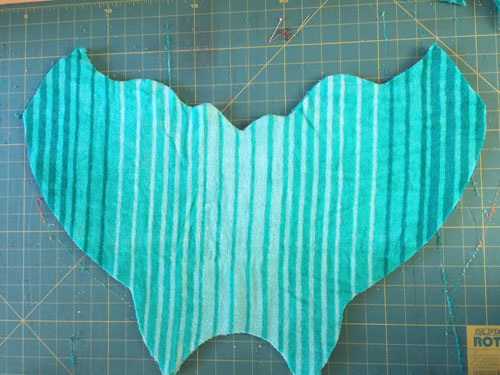
Lay your little mermaid out on one of your two matching beach towels and trace around her body on one side to make the tail shape. The bottom of the tail should comfortably fit around her feet. Mark the curve along the towel with pins on one side. I made the "hips" really wide so that my daughter would have plenty of room for her knees to bend in the tail. I didn't want it to fit too snug. The widest part of the tail was almost as wide as the beach towel. I wanted to keep the entire length of the towel so my girls could snuggle down into it when they were cold.
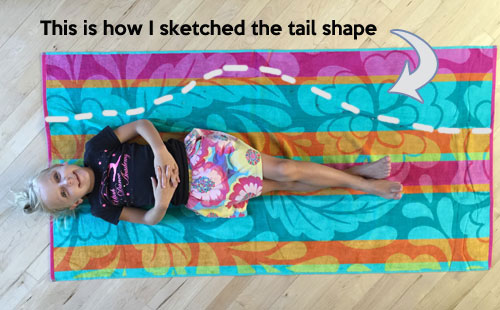
Fold the tail in half lengthwise and cut along the pins. This will make the tail totally symmetrical.
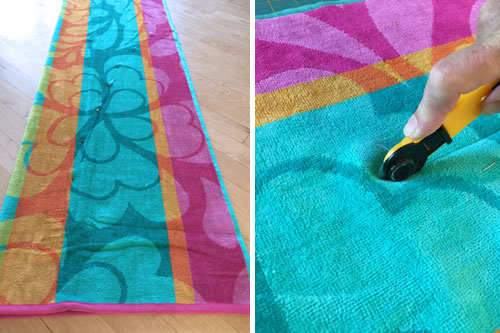
Use the cut towel as the pattern for the second piece of the tail. Lay your cut tail on top of the second beach towel and cut around the edges. You will end up with two matching tail pieces. Because towel fabric is very messy when it is cut, I wanted to bind the edges together with ribbon instead of just leaving the ends unfinished. You could use bias tape or cut one inch strips of fabric if you have something in your craft stash that you want to use up. It is very easy to finish edges using this method. I took plenty of photos to help out any beginners.
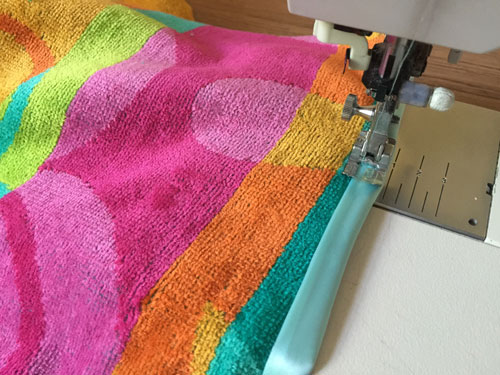
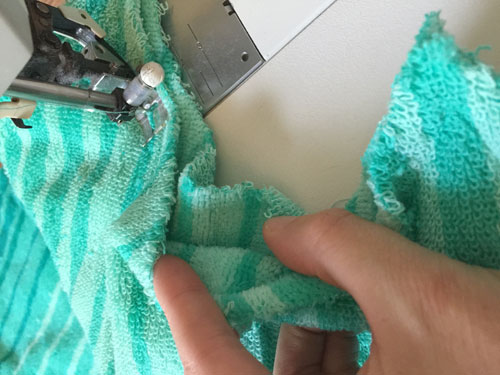
Lay the towels together with the right sides facing out and the wrong sides touching each other. Start at the top of the towel and work towards the end of the tail. Lay the ribbon with the right side of the ribbon facing down on the top of the towel. Leave a 1/4 inch of the fabric on the outside edge of the ribbon.
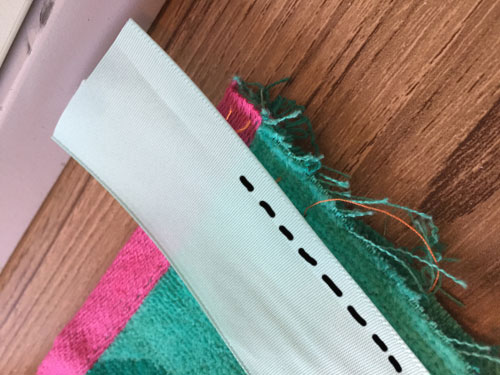
Fold the top edge of the ribbon down and sew the ribbon onto the fabric along where the black dashed line is in the photo. When you get to the end of the towel, leave about one inch of extra ribbon before you cut it off. You will need the extra length to make the finished edge later. Do this to both sides of the tail.
Then, flip the tail over so the ribbon is on the back. Pull the ribbon from behind the fabric and fold it over the top of the tail. Tuck the edge under itself and sew it onto the tail. This creates a nice little neat pocket that holds the edge of the towel fabric inside. It is nice because the inside of the tail is really clean and so is the outside. I use a zig-zag stitch during this step, which makes it so much easier than using a straight stitch to catch all the little edges.
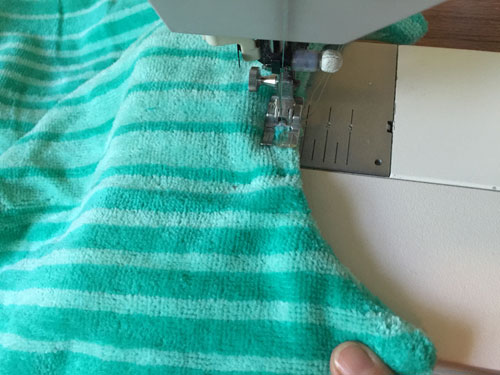
The trickiest part of the process is finishing the bottom edge. Stop sewing about two inches from the bottom end. Fold the extra ribbon up.

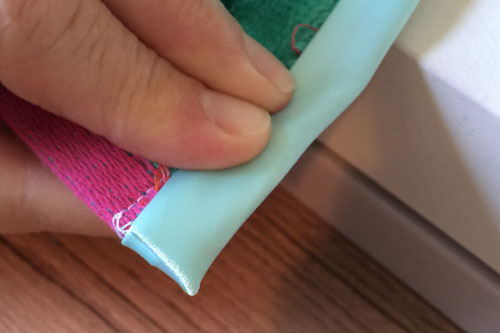
Then, continue to tuck and sew the ribbon just like you did before. When you get to the very end, switch back to a straight stitch and make sure to back stitch to lock it into place. It sounds more complicated than it is.
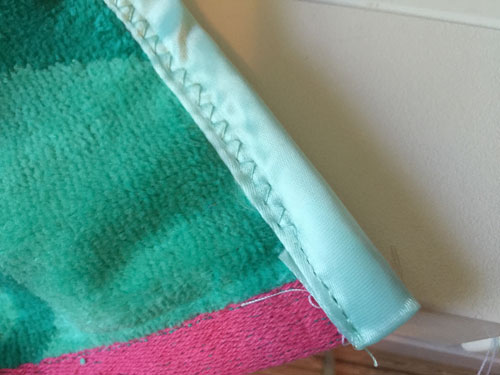
Turn the tail inside out and sew across the bottom to close the end of the tail. All that is left is to make the fin.
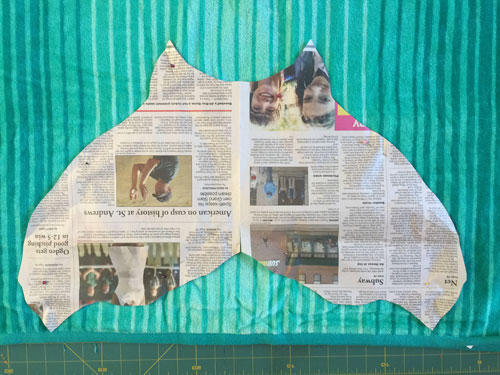
I liked having a contrasting piece of fabric to make the fin.You will have to tape the pieces of the pattern together to make one piece because it is larger than standard printer paper. I made the original one out of newspaper so that is what is shown in the photos.
Lay the pattern on a towel that is folded over. You will get both fin pieces at a time. Pin the pattern onto the folded towel and then cut around the edges.
It will look like this when it is cut.
Place the right sides of the fin together and sew them together. Leave a hole at the top curve so that you can turn the fabric right side out after it is sewn together.
Turn the fin so it is right side out and press all the edges to make sure they are all poked out completely. Then, sew the hole closed. Make sure to tuck the edges inside before you sew so it looks neat and tidy. I continued to sew around the edge of the entire fin. Doing a finishing stitch around the edge helps the fin hold it's shape and it also makes it stronger.
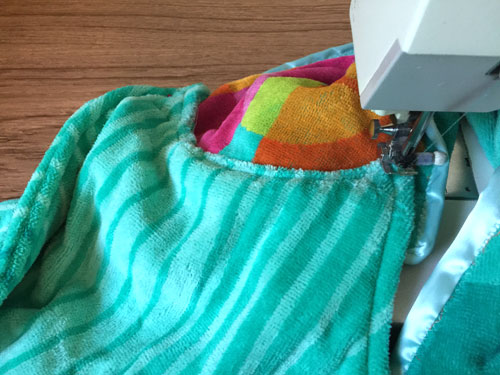
Attach the fin onto the end of the tail. Make sure it is centered and pin it in place.

Start at the center of the fin and sew out to the side and then down to the bottom tip of the fin. Then go back to the center and sew towards the second side and down the fin. Do this because the fabric is very thick on the edges and it is easier to start in the middle. When you sew the ends, you may have to go very slowly with your machine so you don't break a needle. Just take it slow and be careful.
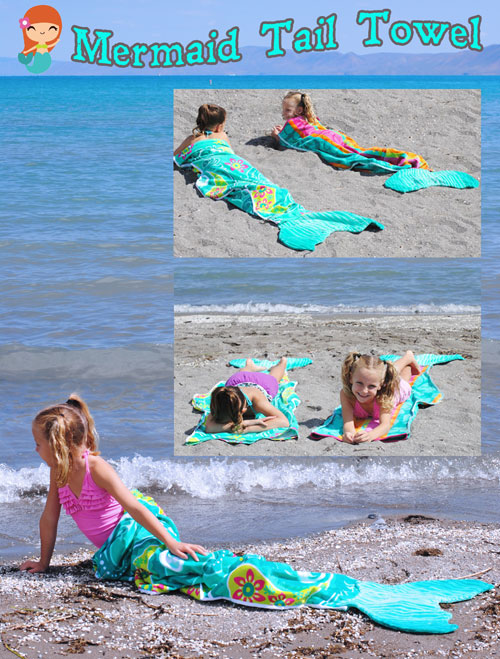
Once your fin is in place, your tail is complete! Each of the mermaid tails that I made took just a little over an hour to complete. It was very satisfying. We were able to test the new mermaid tail towels on the beach this past week and they were a serious hit.
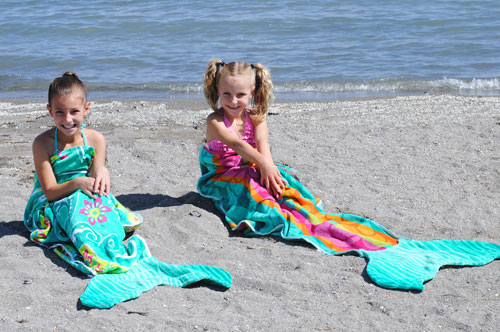
My girls used their new tails to snuggle in when they were wet and cold, and they laid on top of the mermaid towels when they were in the mood to catch some sun. It was so much fun to watch them use their imaginations to pretend to be real mermaids. All of the girls at the beach wanted to try them on. It was a ton of fun. I have no doubt that your own little mermaids will enjoy their tails every bit as much!

When you're ready to take your mermaids to the beach, let our vacation experts help! Whether you want to splash around in Southern California, Hawaii, Mexico, the Caribbean, or anywhere else in the world, let us know. We'll find you the very best deal and take care of you every step of the way. Book online or call our vacation experts at 855-GET-AWAY.


Join the Conversation!
Leave A CommentAnonymousMarch 12 2018
THANK YOU! My son wants a merMAN towel because his sister has a mermaid wrap towel...no merMAN tails to be found. Guess I'll have to stitch one myself with your tutorial! <3
AdelleJuly 30 2016
MustangRom...the towels were regular beach towels. They are bigger than a bath towel. Not sure the exact size. Just make sure it is big enough for your "mermaid." (See the picture above where my daughter is laying on the towel.) There is a pattern you can download for the fin!! It will be the exact size you need. Hope that helps. Have fun making your tail. We still love using ours!
MustangRomJuly 29 2016
Great idea! What are the dimensions of the tail and fin? And size of towels you used?
JoanJuly 24 2016
loved this idea, I always make character hooded towels for my Grandchildren but I know my Granddaughter would love this idea! Was thinking of the Mermaid blanket but think she may like this better! Thanks for the awesome tutorial!
MarianneJuly 19 2016
Fantastic idea, I have thought about the knitted version, but that is a LOT of work, so this looks way quicker, thanks for sharing
AnonymousJuly 15 2016
Awesome idea! Going to make one for my granddaughters.
JaneJuly 14 2016
Just awsome x
Get Away TodaySeptember 11 2015
Thanks for letting us know. We're looking into it now and hope to have it fixed quickly.
AnonymousSeptember 10 2015
I can't download the bottom fin pattern; the top fin pattern downloads just fine.