
If you crave adventure in the great wide somewhere and also love to cozy up with a good book, then Belle is your princess! She is brave, kind, beautiful and smart. You can be the "Belle of the Ball" in this fancy, but easy DIY Belle costume.
It is said that, "True beauty lies within." It doesn't hurt to wear something beautiful on the outside as well. This apron is very easy to put together and is perfect for your little princess at home preparing for your next Disneyland vacation.

Supplies needed for your DIY Belle Apron
Making Your DIY Belle Apron
To start, print your pattern pieces.
Cut the skirt pattern out. This is just PART of the pattern. Because this pattern is meant for regular computer paper, we have to be creative with laying the pattern on the fabric! You want the skirt to be 15 inches long. You can either lay the pattern on the fabric so that the curved end is at the 15 inch mark, or you can pin a solid piece of paper to the pattern to make it 15 inches. This method is shown below.
Fold the fabric in half so that you can cut two skirt pieces at once. One will be the front and the other will act as the liner. Make sure that you place your pattern on the fold edge of the fabric. It will open up to be doubled.

Pin the two fabric skirt pieces together so they don't slip around while you sew. Set this aside for now.

Cut out the Top Pattern for your DIY Belle costume. Fold the open edge of your fabric in-- so that it is four layers deep. Then put the pattern onto the fold and cut it out. It will make two identical pieces.

Next, you will cut out the strip that goes around the neck. It is 17 inches long and 3 inches wide. There is not a pattern for this, so just go by the measurements.
You are done with the cutting process on your DIY Belle costume! Now, it is time to iron. Press all of your pieces. The only tricky part of ironing is the strap. Iron the strap in half lengthwise. Then, open the strap up again. You will be able to see your iron crease along the middle.
Fold one side in towards the crease line and press it into place. Then, fold the opposite side in towards the crease line and press it into place. Then, close the strap back up using your original fold. It will create a nice strap with all of the raw edges tucked inside. It looks like this when it is opened up.

Now it is time to sew your DIY Belle costume! Start by sewing around the sides and bottom of the skirt. Leave the top open. Make a little snip in the fabric from the edge to the thread on each of the points of the curves. Do not snip through the thread though. That will make a hole.

Turn the skirt right side out so that the seams are hidden inside. Iron it flat.
Then, sew a loose straight stitch along the top of the skirt of your DIY Belle costume with a long stitch length. Do this twice, but DO NOT backstitch and keep long thread tails at each end. You will use these lines for gathering and you don't want the edges tacked down.

Place a pin in the center of the skirt to mark your middle. Then, gather the skirt from the outside towards the center. You do this by holding on to either the bobbin thread or the top thread and sliding the fabric along it. The skirt needs to be gathered to be the same width as the apron's top piece. Set it aside while you work on the top.
Sew along the side of the strap to close the long open fold that is left from the ironing process.
Place one of the top pieces flat on the sewing table. Then pin the strap into place. It will go at the top of the heart curves in the pattern. Look at the photo below to see how the strap curves onto the top piece. It is the opposite of how you would wear it!

Then, sew the strap into place.

After the strap is secure, put the second top piece on. Pin it in place. Take the bottom of the "upper" top piece and fold up about 1/2 inch and pin it. See the photo below.

Leave the bottom open as you sew around the sides and top of the top piece.
Then, cut a row of snips along the curved portion of the neckline.

Turn the whole thing right side out and press it flat. Your DIY Belle costume is halfway there!
Now we get to put the top and bottom together. Line up the whole gathered top edge of the skirt to the bottom edge of the shirt piece. You will use the shirt edge that is NOT folded up.

Sew across. Make sure to catch both of your gathering stitches in the seam so they are hidden. Then lay the apron flat. Your DIY Belle costume will start to look like it is almost finished!

Now, pin the folded section of the top apron piece to the skirt.

Sew across the middle of the apron to attach the bottom of the top piece to the skirt.
Now add your red ribbon and rose appliques to your apron. If you are sewing it on in 3 sections, the middle ribbon is 10 inches long and the tie ribbon straps are 21 inches long. Or you can do one long strip that is 31 inches long. We are using a different ribbon for our middle piece. Cut the edge of the red ribbon on an angle to help prevent fraying. If you have a satin ribbon, you can hold the edges near the flame of a candle to melt them, but be careful!
Tuck the straight end of the red ribbon under and then sew it to the edge of the skirt waist. Do the same to the other side of the waist. These will be the ties that hold the apron on the princess!

Now, lay the rose ribbon along the center of the apron across the waist. You can pin it in place. You want the bottom of the ribbon to line up with the seam of the skirt and the top. Sew along the sides, top, and bottom to keep it in place.

The final finishing touch is to glue on the red rose embellishments. Glue a rose at each of the peaks at the bottom of the skirt.

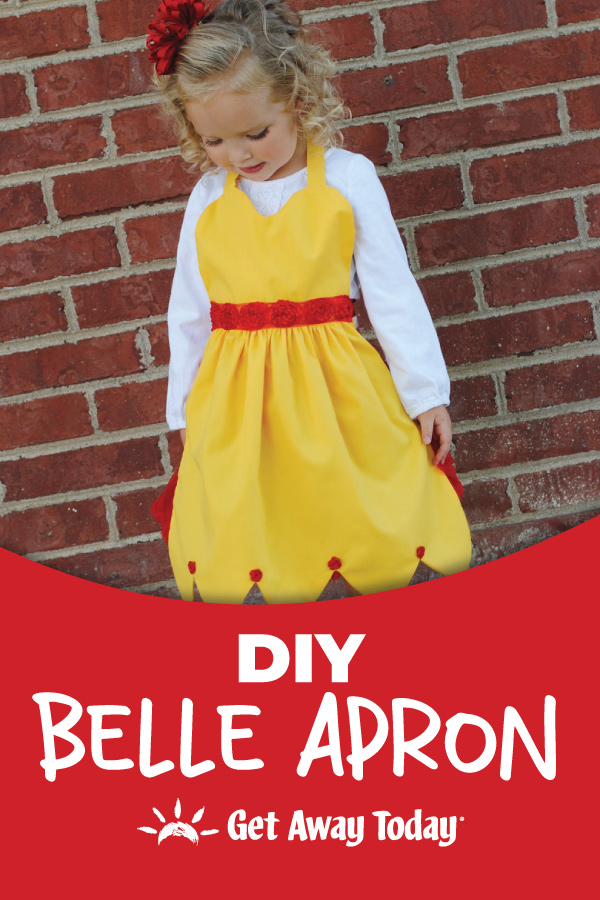
Your DIY Belle costume is complete. Your little princess can now be the Belle of the Ball...or, the Belle of the kitchen!

Book Your Next Disneyland Vacation
The best place to show off your brand new DIY Belle Costume is at the Disneyland Resort! There is no better time and place to dress up like your favorite character.
And of course, Get Away Today has you covered on all of your travel plans! Book your Disneyland package online or call our agents at 855-GET-AWAY.
Join the Conversation!
Leave A Comment