
One of our favorite parts of a Disney vacation or just bringing some Disney into your day is by looking the part of a princess or favorite Disney character. Here are some of our best Princess hairstyles, along with other Disney hairstyle ideas to make getting ready for a day in the theme parks or even a day at school part of the magic.
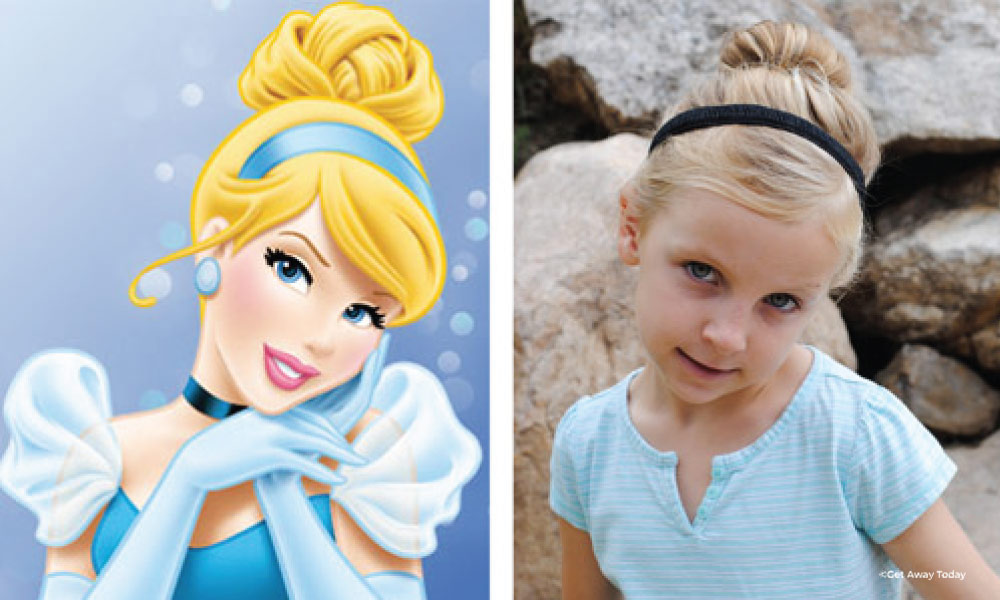
Disney Princess Cinderella Hairdo
Cinderella is one of our all-time favorite stories. We love how she is so sweet and kind. To get Cinderella's up-do, brush hair into a high ponytail.
Then use a bun maker hair styling tool to create the perfect bun and secure it with bobby pins. Finish off your Cinderella look with a cute black headband. It’s a simple way to emulate one of our favorite Disney Princesses.
Beauty and the Beast Hairstyles
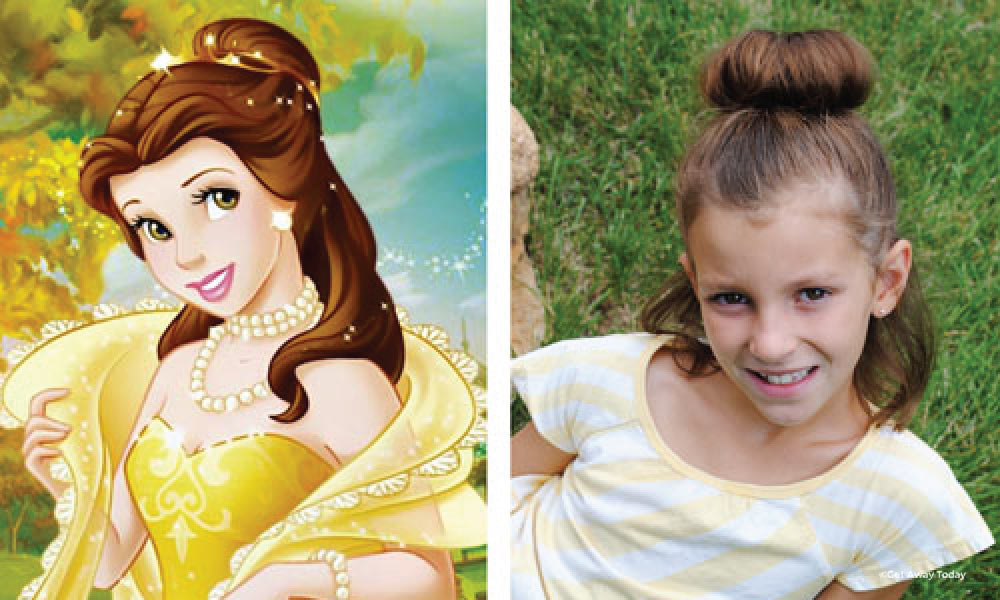
If we had to choose a princess to be part of our Disney vacation study group, it would certainly be Belle. She is always ready to learn and is great at making friends.
To look like Belle, start by putting half of the hair up in a ponytail. Leave the bottom section loose for curls. The top can be pinned into a loose bun with bobby pins.
Curl the bottom section into ringlets with a curling iron. Your princess can be ready in no time for any adventure!
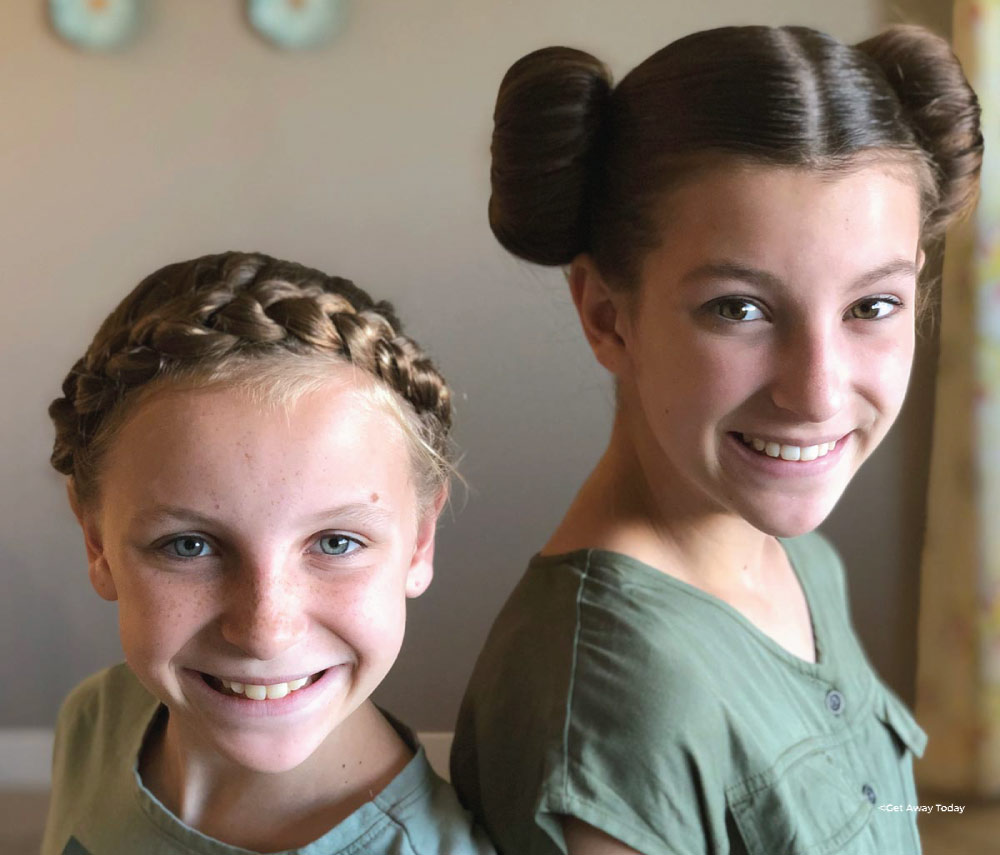
Princess Leia Star Wars Hairdo
These easy Princess Leia hairstyles are out of this world—ideal for a day at Star Wars: Galaxy’s Edge.
For the classic Leia buns part your hair down the center using the edge of the comb to make a nice straight line. Brush each side of your hair into ponytails. Make sure they are even. It will look like cute little pig tails! Smooth out the bumps and spray any loose hairs with hairspray.
Then use a bun maker hair styling tool to create buns on each side of the head. Pin the hair into place with bobby pins. This will help the buns stay in place as you explore all day at Disney! Princess Leia could fight without looking a mess, so you know it is a great style for roller coasters.
The next hair style is the beautiful Princess Crown Braid. We like this one because you can braid hair right out of the shower! Skip blow drying all together. And as an added bonus, you can undo the braid and have awesome wavy curls for the following Disney day.
Part your hair from the tip of each ear. Half of the hair should fall forward and the other half brushed back.
Secure the hair that falls forward with a ponytail or clips to keep it out of the way during the first part of the braid. Start braiding at the left ear. Separate a small section of hair into three sections. Dutch braid the hair down and around the back of your head.
Add a new section of hair when you braid from the top but not when you are braiding the bottom strand. Basically, you add hair every third twist of the braid.
Continue to add hair and braid around until you reach the top of the right ear. Then, release the sectioned off hair and start including that in your braid.
Pull the braid around the front of your head in the same fashion as the back. When you have all of the main hair gathered into the braid, do a simple braid to finish down to the ends of the hair. Tie it off with a small ponytail.
Tuck the extended braid piece on top of the braid in the back. Hide the end of the hair with a bobby pin.
Disney Frozen Hairstyles
Princess Anna is fun and outgoing. She makes us laugh and is the perfect example of how to be a good sister. If you want to match Anna, then two simple braids are the way to go.
Start by parting the hair in the middle. Braid each side of the hair from behind the ear down towards the shoulder. Secure the ends with a hair tie. This hairstyle is perfect for mornings with wet hair. You can even add in a streak of blonde hair just like Anna!
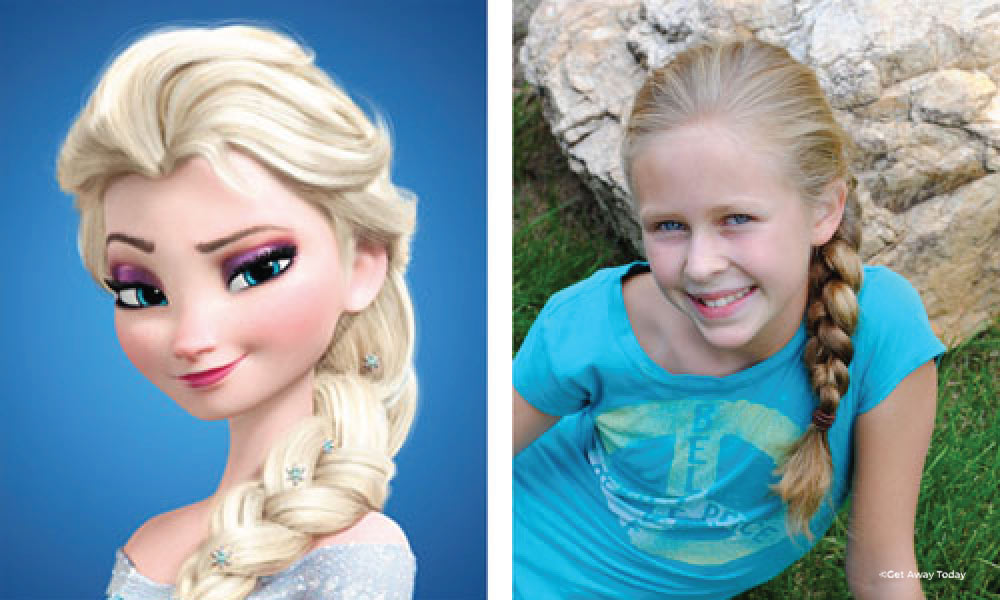
 Princess Elsa has taken the world by storm! We have spent many hours singing "Let it go!" and pretending to have our own icy powers. If you want to look like the ice queen, then give a french braid a try. Start the braid on the right side of and wrap the braid around your head as you go along. It should end on the left side just above the ear.
Another option is to use a hair waver first to give the hair some volume before putting into a braid that drapes over one side. You can also lightly pull at each braided section to give a more full braid look rather than a tight braid.
Princess Elsa has taken the world by storm! We have spent many hours singing "Let it go!" and pretending to have our own icy powers. If you want to look like the ice queen, then give a french braid a try. Start the braid on the right side of and wrap the braid around your head as you go along. It should end on the left side just above the ear.
Another option is to use a hair waver first to give the hair some volume before putting into a braid that drapes over one side. You can also lightly pull at each braided section to give a more full braid look rather than a tight braid.
Minnie Mouse Hairdo Ideas
Minnie always looks chic in her polka dots and high heels. Minnie is so cute and nice. Even though Minnie doesn't have hair, you can still recreate her look with the Minnie Mouse Hair Bow style.
The steps are really simple:
- Put the hair in a high ponytail bun on top of your head with excess hair pointing forward. Then split the bun in half. Wrap the remaining hair over the split section and secure it in place with bobby pins.
- Split the bun into two and use the excess hair to wrap backwards.
- Secure loose ends with bobby pins and spray to hold in place.
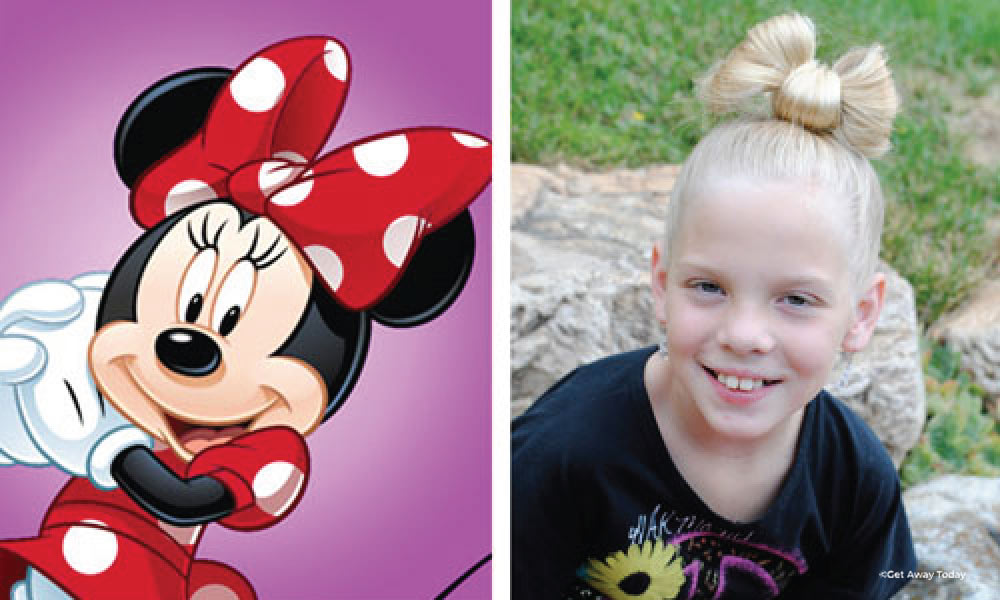
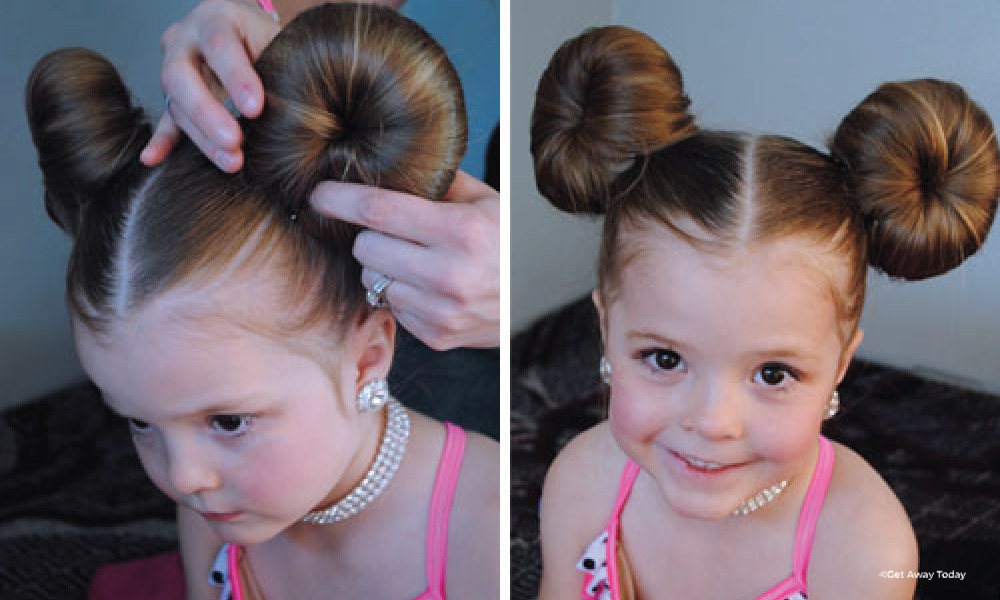
The next Minnie Mouse hairstyle gives two buns fashioned more like mouse ears and you’ll add a bow in the center of the finished product.
To start, pull the hair into two high ponytails on each side of her head. The part needs to be along the center of her head.
Brush the hair so it is smooth and flat. Wrap the ends over the hair donut and spray the ends with water or hair spray (whatever you prefer). Make sure the hair is smooth and start rolling the hair donut down the ponytail towards your head. Pull it tight and smooth the stray hairs as you go.
Spread the hair out all along the donut and clip the snap together.Adjust the hair on the donut so that it covers it completely and then pin it in place with hair pins (bobby pins). Repeat with the other side and add a bow to match, then you’re ready to go!
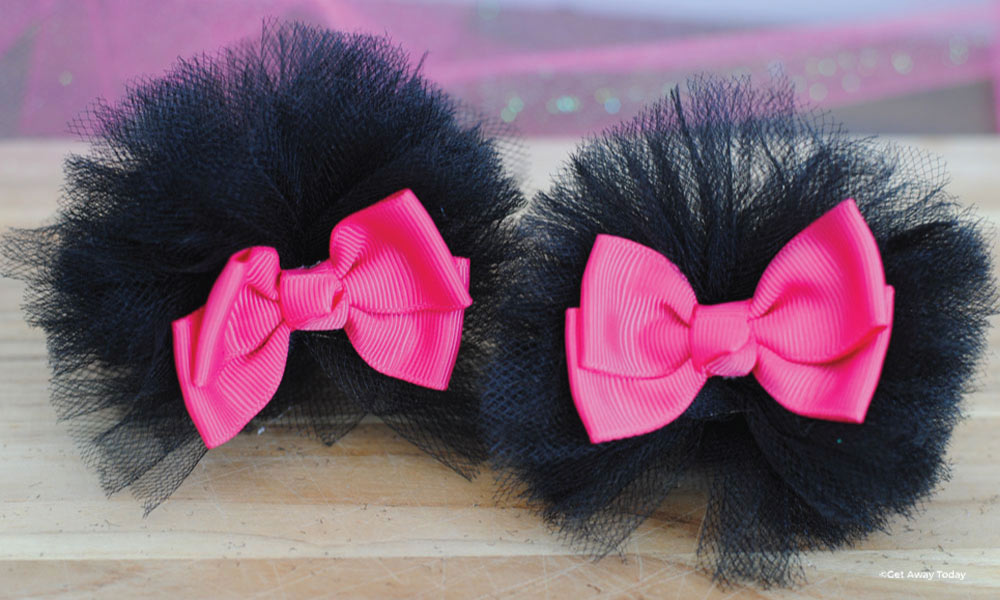
The next Minnie Mouse hairdo is making a simple set of clips you can add into almost any hairstyle! You’ll need:
- Roll of Black Tulle
- 2 Metal Hair Clips
- Cute Bows or Ribbon to Make Bows
- Hot Glue Gun
- Scissors
- Smartphone or Small Book for Wrapping
Plan Your Princess Day at Disney
Getting ready like a princess can be a lot of fun! We hope your mornings go more smoothly with a little bit of royal imagination!
And of course, for the most fun, you can bring your princess to meet all of her favorite princesses in person! Get one-on-one time with the royal beauties of the Disneyland Resort or Walt Disney World Resort. When you're ready to plan your Disneyland vacation, book one of our packages online or call our Disney Experts at 855-GET-AWAY.
Join the Conversation!
Leave A CommentjoeyAugust 26 2020
my daughter loves it i did them on her