

The Wizarding World of Harry Potter at Universal Studios (on both coasts!)Universal Studios (on both coasts!) is one of our favorite places to visit. The magic can be felt all the way from the enchanted line through Hogwarts Castle to every delectable treat in Honeydukes. You too can capture some of this magic at home by making your very own Harry Potter wand.
While you may be saving your Galleons to buy an interactive wand on your next visit, you'll be able to practice your swish and flick with these easy and realistic DIY wands. Check out our video to see just how easy it is to make your own Harry Potter wand:
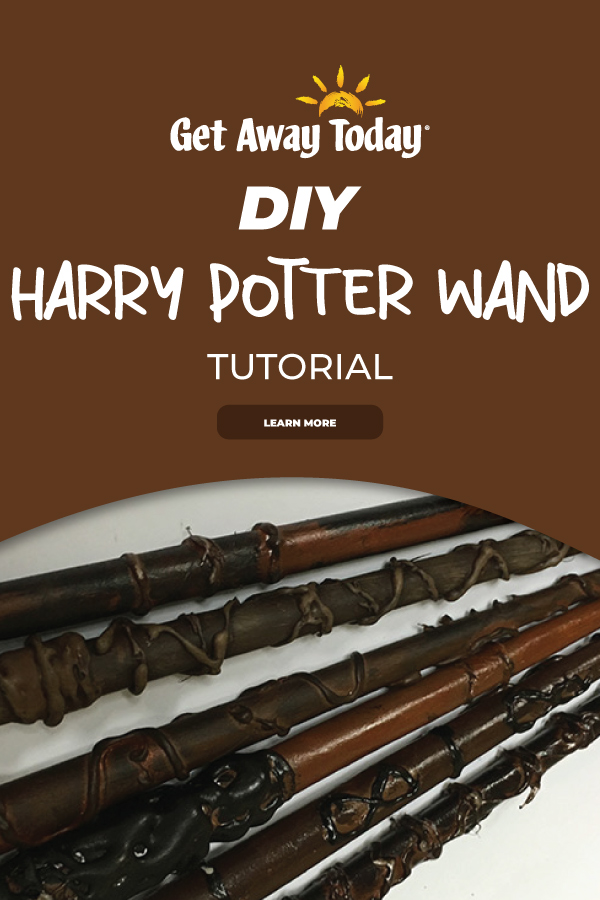
Don't the wands look great? Plus, they're easy to make and require items you most likely have around the house.
DIY Harry Potter Wand Supplies:
Printer paper Elmer's Glue Hot glue gun Acrylic paints (browns, grays and natural colors work best) Paint brushes Acrylic Spray
DIY Harry Potter Wand Instructions
Now that you've gathered all your supplies, begin with a piece of printer paper and Elmer's Glue. Glue along two sides of the paper, making an "L."
Then, roll the paper from the opposite (non-glued) corner to create the desired size and shape of your Harry Potter wand. Once you've reached the end of rolling, pat down and let the glue dry.


Once everything is dry, put a base coat of paint on your wand. We recommend using a lighter color. This doesn't have to be perfect, it just needs to cover up most of the white.
After the base coat has dried, begin designing your wand. All you have to do is draw a design directly onto the wand using your glue gun. This step can be as simple or as complex as you'd like. You can layer the glue for a handle or even stick to a few simple rings. Design the wand to represent who you are as a wizard!


The final step really brings the wands to life. You'll need to go outside and spray your wand with the acrylic spray. Make sure to cover the whole wand and let it dry completely for four hours. Make sure not to cast any spells while the wand is drying!
Once the acrylic spray is dry, your wand is complete. You can now test your spell knowledge and prepare for your visit to Hogwarts.

Book Your Next Universal Studios Harry Potter Vacation
If you don't have a trip to Hogwarts planned, we can help! You'll be able to explore the wizarding school for yourself during the Harry Potter and the Forbidden Journey attraction at Universal Studios Hollywood. Or, explore Hogsmeade and all the wizarding shops your heart could desire. Just make sure to take advantage of our discount Universal Studios tickets and reduced hotel rates. You can book online or over the phone at 855-GET-AWAY. You'll be surprised at just how many Galleons you can save!


Join the Conversation!
Leave A Comment