We're sorry but your browser doesn't support some of the newer web features we take advantage of. In order to use this site please consider installing the latest version of one of the following browsers:

DIY Travel LEGO Box
November 30, 2017
Author: Adelle Belnap
0 Comments

 
Take your LEGOs anywhere with this DIY travel LEGO box. This vacation craft is perfect for entertaining young children on road trips, during a flight, in line at a theme park or even at your hotel. Make it even easier with our free printable and instructions.

DIY Travel Lego Box

If you are traveling to Legoland California with your family for a fun adventure, this craft is a perfect addition to your packing list. It is just the right size to fit into busy little hands and into a travel backpack or fanny pack – if you’re retro like that.

LEGOs are considered one of the most popular toys ever invented. Why? Because, they are practically indestructible and have unlimited building possibilities. You can build a dream house, a space ship or a race car with an ordinary pile of Lego bricks. A single collection of bricks can convert to hours of imaginary fun. 

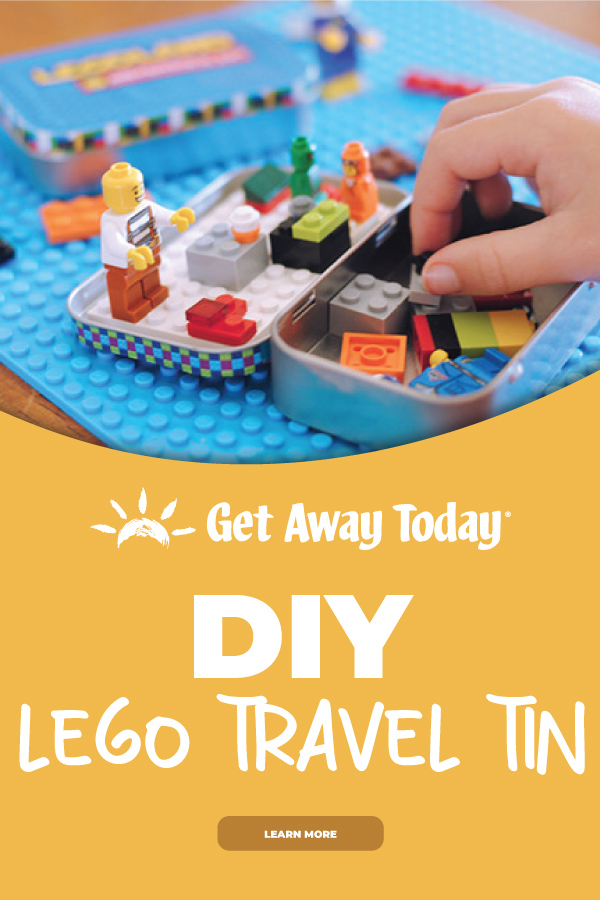
Take that fun with you on the road to help keep your little ones entertained on vacation. There are bound to be moments of inactivity when traveling and often, these moments are filled with screen time. Switch out the cartoon or video game with something much better...LEGOs! These DIY travel LEGO boxes are small, but they pack a big punch. 

DIY Travel Lego Box

It is easy to create your own travel LEGO box with our free printable. You could even give it as a surprise gift for your kids when you tell them you are headed on a trip to Legoland California! 

You will need:
2x3 LEGO Base OR LEGO Tape

Start by emptying an Altoids container. Wipe out the minty dust from the corners. Then, print the free DIY Travel LEGO Box Template. Both a blue and pink option are offered on the template.

DIY Travel Lego Box Printable

Cut out the entire colored square that you are using for your craft. It should be bigger than the top of the Altoids tin.

DIY Travel Lego Box Printed

Brush the back of the paper and the top of the Altoids tin with Mod Podge. Make sure it covers to the edges of the tin. Stick the paper onto the lid and press it firmly until it has adhered completely. 

DIY Travel Lego Box Paper

Flip the container over and trim the excess paper off with an Exacto knife. Be careful not to rip the paper as you cut it. 

DIY Travel Lego Box Exacto

This method will ensure that it fits the lid perfectly!

DIY Travel Lego Box Fitted

This next step is just for the perfectionists out there! You can color the white edge of the paper with a raspberry or blue colored marker, depending on the printable you chose, to make it look a little bit more "finished." It will also hide any little imperfections from the cutting step if you had some mishaps with the Exacto knife. 

DIY Travel Lego Box Marker

Next, cut the strip of paper from the template that matches your selected Legoland Adventure top. You are going to have to trim this strip to fit the space on the Altoids Tin. Because everyone's printer settings are a little bit different, I made this strip slightly larger than it needs to be. I wanted to be sure it would fit even if the printer settings were off a little bit. 

DIY Travel Lego Box Strip

Measure the side of the Altoids tin from the little lip to the top of the lid. Then cut the strip to be that wide. I trimmed just a tiny bit of the pattern. Make sure it fits well before you use any glue! The strip does not fit all the way around the lid. Start in the back corner and wrap it around to the front of the tin and then back to the other back corner. Make them centered in the back. It will go to the hinges.  

Paste a layer of Mod Podge along the side of the tin and then on the back of the strip. Press it into place. Smooth the paper down around the corners so it is a nice snug fit. 

Cover the entire lid with a thin layer of Mod Podge and let it dry. 

DIY Travel Lego Box Paste

I put three layers of Mod Podge on my DIY travel LEGO boxes to help make them durable and water resistant. Make sure to let the glue dry between adding coats. 

Plug in your hot glue gun and get it ready to go. Once it is, glue the 2x3 LEGO base into the inside of the lid. Liberally cover the back of the base with the hot glue and press it to the tin. Hold it in place firmly for a few seconds to make sure it attaches well. If you don't have a LEGO base this size, you could use that cool new LEGO tape. It should stick to the Altoids tin without any issues! 

DIY Travel Lego Box Base

It doesn't take long for hot glue to set. Once it does, fill your container with a variety of LEGO pieces and characters. I found the cutest little LEGO figures that were perfect for my DIY travel LEGO box. Regular mini figurines will fit too. You can rotate the LEGOs that you include in the sets to keep them fresh and entertaining. 

DIY Travel Lego Box

My kids have loved playing with their DIY travel LEGO boxes. We took them to the dentist as a test run and it was a perfect distraction while we waited for our appointment to start. I can't wait to try them out on a road trip...especially on a trip to Legoland California! Building fun family memories is easy at Legoland and your DIY travel LEGO box will be a great addition to the fun. 

Check out more Lego fun in these great articles: 


DIY Travel LEGO Box Pin Image

Join the Conversation!

Leave A Comment
0 Comments

Leave a Comment