
Cool off in the summer heat at Disneyland or Walt Disney World with this easy DIY Disney Cooling Wrap tutorial. With easy to follow step-by-step instructions with photographs, this project is perfect for any sewing skill level.

When the warm summer sun is shining at the Disney Parks, things can get a little bit warm. Disney does a fantastic job keeping guests cool and comfortable with plenty of beautiful shady trees, cooling canopies and indoor line queues. Water rides are also a great option for people in need of cooling down with a splash! The air conditioning is nice and chilly on all of the indoor attractions as well.
Cool frosty and frozen treats are available for guests who want to relax and enjoy a refreshing beverage or dessert. Free small cups of ice water are available at all of the Disney restaurants. Just ask for a glass of water and they are happy to help! It is a great benefit on a warm sunny day.
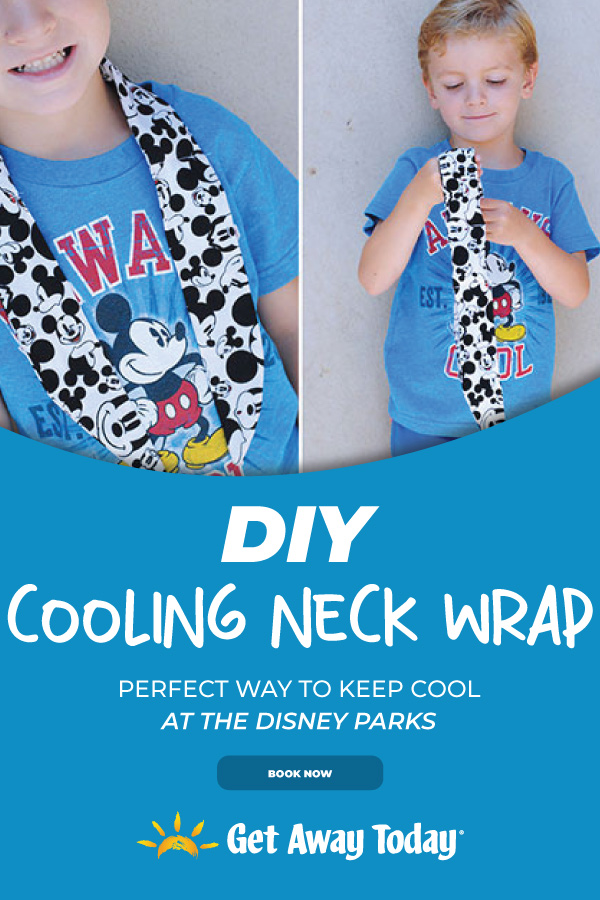
Another fun way to keep cool at Disneyland or Walt Disney World is to sew a cooling neck wrap. Pick a cute Disney fabric print to make your wrap extra magical. These wraps are a popular summer sewing craft and seem to really make a difference in keeping the core body temperature low.
How do the cooling neck wraps work? Water absorbs into the water beads that fill the wrap. As the water slowly evaporates during the day, the wrap has a cooling effect. Kind of like a swamp cooler or evaporative cooling system in a house!
These Disney cooling neck wraps are comfortable to wear and cute. Let your children help pick out their favorite character fabric before sewing the wraps. It is a project that is perfect for any skill level or age.
Supplies Needed For Your DIY Disney Cooling Neck Wrap
5x33 inches of fabric
4 tsp Water Jewels
Sewing Machine
Cutting table and rotary cutter
Ruler
Straight Pins
You can choose any sort of cotton print for this cooling neck wrap project. There are so many fun fabrics to choose from!

Making Your DIY Disney Cooling Neck Wrap
Start by making sure that your fabric is cut to measure 5 inches wide and 33 inches long.

Then fold the fabric in half lengthwise so it is long and skinny. The wrong side of the fabric should be showing. Measure five inches from one edge and mark the spot.

Start at the five inch mark and cut a curve in the fabric out towards the edge. Make sure to cut the open side of the fabric and NOT on the fold. It should just be a gradual curve to make a point at the end. Repeat the step so that both sides of the fabric have the curve.

Your fabric will look like the picture above. The next step is to sew the edge. Start an inch from the center of the fabric and sew out towards the tip of the curve. Use a generous 1/2 inch seam allowance.
You need to leave an opening in the middle of the strip so that you can turn and fill your cooling neck wrap. The opening will be about 2 inches long. Start on the other end of the opening and sew towards the second tip of the fabric. The seam will look something like this:

Now, turn the cooling neck wrap so it is right side out. An easy way to do this is to use a pencil. Stick the end of the pencil into the end of the fabric and gather the fabric down the pencil stick. Then push the tip of the pencil out of the 2-inch opening in the center of the strip. The fabric will turn easily as you slide the pencil through the hole. Repeat on the other side so the whole strip is right side out.

Now it is time to sew the "pockets" that hold the water jewels. The tiny beads grow to about 100 times their size when they get wet. They become gooey and squishy. You are going to be tempted to use more beads than instructed, but do not fall into temptation. Trust me that you only need a small amount. If you are making this project with little hands around, please be very careful that they do not get ingested.

We are going to sew four pockets into the cooling neck wrap. Don't worry, it is really simple! Fold your fabric in half and mark the center line with a pin.

Keep the fabric folded in half. Measure 3 inches from the center line and mark it with a pin on the top piece of fabric and on the bottom piece. Then, measure 3 inches from that mark and pin the top and mark the spot with a pin on both pieces of fabric. (These pins will be 6 inches from the center line.)
These are the places you are going to sew the pocket lines. When it is done it will look like this picture below. Can you see the five seams where your pins are?

Start by sewing one of the lines where the 6 inch pin is placed. It is the farthest line from the center mark.

Pour 1/4 tsp of water jewels into the cooling neck wrap and let them settle on top of the seam you just made with the thread.

Then, being careful to keep the beads in their place, sew a seam at the 3-inch pin marker. Fill it with 1/4 tsp of beads and scoot them down so they are settled on the thread line. Then, sew the center line closed.
Make sure that you have some of the opening left so you can fill the second side.
Repeat the process on the second side starting with the 6-inch pin marker. Sew the line across the scarf and fill it with 1/4 tsp of beads. Then, sew the 3-inch pin location. Fill the last pocket with 1/4 tsp of beads and then close the opening all the way across the side of the scarf. Make sure to tuck the edges inside so it is a nice clean finish.

Your Disney cooling neck wrap is ready to soak. Place the wrap into warm water for about 10-15 minutes. The water will absorb into the water jewels and they will puff up. You can put the cooling neck wrap into the refrigerator for about 30 minutes to get it cool before wearing. Do not place it in the freezer as that will damage the jewels.
Wrap the cooling neck wrap around your neck and tie it loosely in place. Enjoy the cooling effects of evaporation!

Booking Your Disney Parks Vacation
We hope this fun DIY Disney cooling neck wrap tutorial will help you keep cool during your next visit to Disneyland or Disney World. What are your favorite ways to stay cool and comfortable at the theme parks? Feel free to share your tips in the comments below.
To get the best price and service on your Disney vacation, give our travel experts a call at 855-GET-AWAY. Or, book any of our Walt Disney World and Disneyland packages online. Whichever you choose, you'll know your wallet is staying cool by saving the most.


Join the Conversation!
Leave A CommentGet Away TodayOctober 23 2024
Hi! We've linked some water beads in the post above, or you may be able to find them at your local craft store. Happy sewing!
AnonymousOctober 22 2024
Love this idea. Going to make some and sell at my next arts & crafts event. Where can I purchase these water beads?
Get Away TodayAugust 22 2019
Amy- Once water beads soak up water, they can stay plump 6 - 8 hours. If you would like to use this neck wrap while in the park, we suggest submerging the wrap in one of the complimentary cups of water you can get from any Disney restaurant. To avoid damaging the beads, decant the water while leaving the ice cubes behind and soak those beads until they're nice and fat. Hope this helps!
AmyAugust 21 2019
This is interesting, I wouldn't think to use those beads in a cooling towel. My friend and I bought cooling towels online and used those. They worked great, they were best when they were soaked with cold water. Since I've only seen these beads, I don't much about them. How long do they hold onto the water, and can you use cold water to soak them in? Since you can't exactly cool the towels down in the parks, soaking in warm water and needing to cool them in the fridge concerns me.