
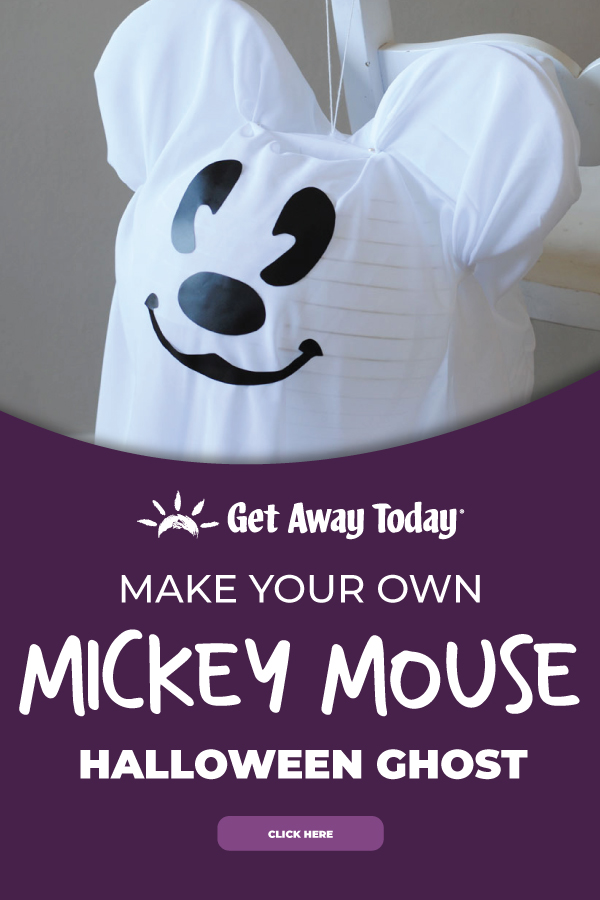
This Mickey Mouse Halloween Ghost tutorial is so easy...it's spooky! Make your own copycat Mickey Ghost just like at Disneyland to hang in your own home during Halloween time.
Halloween Time at Disneyland is full of ghostly fun. The not-so-spooky decor screams Halloween without making you actually scream! It is perfect for kids. It’s one of the most popular times to visit Disneyland Resort for good reason!

Mickey Mouse Halloween Ghost Tutorial
You can make your own Mickey Mouse Halloween Ghost with this easy tutorial. With just a few supplies, your house can glow with Mickey's happy spirit during the whole Halloween season.
Mickey Mouse Halloween Ghost Supplies:
- White Paper Lantern
- Small Battery-Operated Light
- String
- 44 inches Sheer White Fabric
- 2 6 Inch Styrofoam Circles
- Fast Drying Glue (Not Hot)
- Black Vinyl
- 6-8 straight pins
- Scissors
- Pencil
Mickey Mouse Halloween Ghost Instructions:
Gathering these supplies is simple. We’ve linked a few above on Amazon.
Take the lantern out of the packaging and tie the headlamp light onto the top part of the wire lantern frame. I used a strand of thick string.

The light is going to hang down from the metal frame and illuminate the inside of the lantern.
Next, stretch the paper part of the lantern over the metal frame to make it into a ball. Just be careful to stretch the paper slowly so it doesn't rip.

Set the lantern aside for a moment while you get the Mickey ears ready. Slice the side of each of the Styrofoam circles off with a serrated knife. I just estimated the angle of the cut. You want them to lay flat onto the circle part of the lantern.
Cut one, and then use that ear as a template for the second one, so they end up the same!

You cannot use hot glue for this project, because it will melt the paper lantern and the foam. Put a good amount of glue on the cut edge of the foam ear and then stick it onto the lantern. Position it near the top where a Mickey Mouse ear would naturally go.
You have to hold the ear in place for a little while to let the glue set. If you feel like the ear needs a little reinforcement, add a line of glue around the outside edges. Let it dry.
Repeat the process with the second ear.

When the ears are set up and solid, you can move on to the next step. The fabric should be about 40-46 inches long. If you have frayed edges, you can cut it with a pinking shears blade. This helps prevent fraying.

Find the center of the fabric and mark it with a pin. Drape the fabric over the lantern. Make sure the center is right over the top center of the lantern. Make a little hole in the fabric and pull the lantern string through the hole.
You may want to pin the fabric into place around the ears to give the Mickey Mouse Halloween Ghost a little bit more shape. You can gather the fabric in little pleats and then use a long straight pin to hold it into place. The pin will stick right into the Styrofoam ears. It does not stick into the lantern.
Work the fabric until you have it how you want it. I ended up using six straight pins.

The final step is to add the cute Mickey face. You can download the pattern for the face above. I drew the shapes for mine, so if you want to get artsy, go ahead and make your own!
Trace the face shapes onto the back side of the black vinyl.
Cut the shapes out.

Then, peel the back side of the vinyl off. It will be sticky. Press the shapes onto the fabric where the Mickey Mouse face should be. You have to press it and secure it into place pretty aggressively, or the stickers fall off. Just be careful not to smash the lantern.

Your cute Mickey Mouse Halloween Ghost is ready to haunt your house!

Reach your hand up inside the bottom of the lantern to turn the light on and off.

We hope you have fun making your own copycat Mickey Mouse Halloween Ghost. If you happen to be heading to Disneyland during Halloween Time, make sure to watch for all of the cute Mickey Mouse Halloween Ghost decorations, food and merchandise.
To experience Halloween Time at Disneyland for yourself, you’ll want to book your not-so-spooky trip now. We offer discount Disneyland tickets and reduced hotel rates – which all add up to a savings that’s worth a few screams. Book any of our Disneyland packages online now or give our Disney travel experts a call at 855-GET-AWAY.


Join the Conversation!
Leave A Comment